

Agility Blue Update (May 2023)
What's New?
General Enhancements
Draft tasks can now be toggled on or off on the open tasks dashboard. A draft task will appear with a dotted border and yellow tint to the title background of the task. The toggle button is located next to the refresh button.
The grid filter row visibility is now "sticky" when toggled on or off. This behavior is shared with all grids and is persistent on a per-browser basis.
A context menu has been added to the projects grid so projects can now be edited or deleted directly from the grid without having to navigate into the project details page to edit or delete a project.
Exporting grid data to Excel now converts HTML data stored in text fields to plain text. This behavior can be enabled or disabled on the workspace settings page.
Saved grid filters can now be applied to the following grids:
Notification Log Grid
Any Custom Object Grid
The billing entry quantity increment can now be defined on the workspace settings page under the "Billing" tab. This is the amount added or subtracted from the quantity when a user clicks on the quantity arrow buttons or uses the up and down keyboard arrows within the quantity field on the billing entry form.
New user button added to the workspace users page so admins don't have to navigate to the home area just to add users.
Added the following additional user management shortcuts for organization admins to the workspace users grid context menu:
Account Details (jump to the user's account details page)
Disable (disable the user's access to Agility Blue)
Delete (delete the user)
Feature Preview: Multi-Edit in Grid
With this update, we've released the second phase of multi-edit capabilities as part of the feature preview mode. For users that wish to see and test multi-edit actions, they will need to have the feature preview mode enabled. To enable feature preview, click on your user menu at the top right of the app and select the "Enable Feature Preview" option. You can tell when you're in feature preview mode because you will see the yellow text "Feature Preview Enabled" in the top-left global breadcrumb.
This second phase introduces expanded multi-edit capabilities into the following workspace-level grids:
Clients
Matters
Projects
Tasks
Contacts
Billing Entries
Media Log Entries
Volumes
Custom Objects
Other grids and grids within details pages will be released as part of the third phase of updates.

To bring up the multi-edit capabilities on a suppported grid, click on the multi-edit toggle button icon on the far left side of the grid toolbar. When multi-edit is enabled on a grid, the selection mode drop down, edit selected records button, apply an action to selected records button, delete selected records button, select/deselect records on the current page checkbox, and select/deselect record checkboxes will be shown. The multi-edit selection mode drop down will give you the opportunity to choose the selection type (either selected records, or all filtered records). After selecting the records you wish to update, click the edit button and you will be presented with the multi-edit form for that object. Below is an example of the the billing entries multi-edit form:

Select the fields that you wish to update, enter the values you would like into those fields, and click the save button. The multi-edit progress window will be displayed and will provide the results when the operation finishes.
Note the following details while applying multi-edit actions:
Multi-edit actions will not trigger notifications.
Multi-edit actions will not trigger custom automations.
Multi-edit actions will not be able to apply some validations. For example, it's possible to mark multiple tasks as completed without assigning users or changing due dates to ongoing even if the workspace task settings don't allow it.
Refreshing your browser or navigating away from the page while the multi-edit operation is in progress will interrupt the process and only some of the records will be updated.
Selecting many records may take a while to complete, so plan accordingly.
Pro subscriptions are limited to a maximum of 5,000 record updates at a time and the multi-edit speeds are throttled. Enterprise subscriptions have no restrictions.
Multi-edit permissions are automatically applied to the workspace administrators permissions group by default. If admins want other permissions groups to have multi-edit capabilities, they will need to enable them in the desired permissions groups under the "Misc" category.
Please keep in mind that multi-edit is considered preview tech in beta right now and some of the architecture and design may change before we officially promote it to live production status. Upcoming phase updates will bring additional multi-edit capability throughout the app.
To bring up the multi-edit capabilities on the open tasks dashboard, click on the multi-edit toggle button icon directly to the left of the refresh button. When multi-edit is enabled, the multi-edit options panel will appear and checkboxes will show up to the left of all of the task cards. The multi-edit options panel will give you the opportunity to choose the selection type (either selected tasks, or all filtered/visible tasks), and an action selector. After selecting the tasks you wish to update and an action, click the apply button. Additional input will be presented if necessary and then the multi-edit progress window will appear with a progress bar that provides feedback for how far along the operation is.
Additional Updates
Added a link on the user menu to allow users to submit feature requests.
Added Germany as a locale option on the workspace settings page.
The billing types drop down list is now sorted by name instead of id.
Additional fields have been added to the edit project modal window in order to allow projects to be edited from other areas of the application.
Added the "Notifications Enabled?" and "Pricing Agreement" fields to the projects grid.
Added the "Active?" field to the client and matter modal windows.
[Developer] Patching is now available for the custom objects API endpoints.
Bug Fixes
Fixed an issue where rich text editor values were not being recognized when adding custom object field references on-the-fly when multiple modal windows are active.
Agility Blue Update (February 2023)
What's New?
Billing Associations
Billing entries no longer require a project or task and can now be associated directly with clients or matters. The project and task fields were removed from the billing entry form and a new "Association" field has been added that lets you choose between none, client, matter, project, or task.

In addition to the existing task and project locations, new opportunities to create billing entries have been added to the following places:
From the "New" dropdown at the top navigation bar, the association will default to "None".
From the Billing Entries global workspace page, the association will default to "None".
From the Billing Entries tab on a client details page, the association will default to the current client.
From a link in the right-hand action panel on a client details page, the association will default to the current client.
From the Billing Entries tab on a matter details page, the association will default to the current matter.
From a link in the right-hand action panel on a matter details page, the association will default to the current matter.
For new billing entries, the pre-selected association is aware of where the billing entry is being created from, such as from a task or from a matter. Changing the associated parent item will also refresh the billing profile information appropriate for that parent.
Additionally, billing entries can now be moved around freely from object to object or parent to parent by simply changing their association.
Feature Preview: Multi-Edit
With this update, we've released the first phase of multi-edit capabilities as part of the feature preview mode. Users who wish to see and test multi-edit actions will first need to enable feature preview mode. To enable feature preview, click on your user menu at the top right of the app and select the "Enable Feature Preview" option. You can tell when you're in feature preview mode because you will see the yellow text "Feature Preview Enabled" in the top-left global breadcrumb.
This first phase starts with allowing multiple tasks on the Open Tasks dashboard to be updated using a variety of actions:
Assign to me
Assign to someone
Unassign
Mark as completed
Change the due date
Place on hold
Release hold
Place into quality control
Add a comment
Add subscribers
Move to project
Cancel
Reopen
Delete

To bring up the multi-edit capabilities on the open tasks dashboard, click on the multi-edit toggle button icon directly to the left of the refresh button. When multi-edit is enabled, the multi-edit options panel will appear and checkboxes will show up to the left of all of the task cards. The multi-edit options panel will give you the opportunity to choose the selection type (either selected tasks, or all filtered/visible tasks), and an action selector. After selecting the tasks you wish to update and an action, click the apply button. Additional input will be presented if necessary and then the multi-edit progress window will appear with a progress bar that provides feedback for how far along the operation is.
Note the following details while applying multi-edit actions to multiple tasks:
Multi-edit actions will not trigger notifications.
Multi-edit actions will not trigger custom automations.
Multi-edit actions will not be able to apply some validations. For example, it's possible to mark multiple tasks as completed without assigning users or changing due dates to ongoing even if the workspace task settings don't allow it.
Refreshing your browser or navigating away from the open tasks page while the multi-edit operation is in progress will interrupt the process and only some of the tasks will be updated.
Selecting many tasks may take a while to complete. A good benchmark assumption is about 1 second per task, so updating 300 tasks may take around 5 minutes to complete.
Please keep in mind that multi-edit is considered preview tech right now and some of the architecture and design will likely change before we officially promote it to live production status. Upcoming phase updates will bring multi-edit capability throughout the app - including grids for all objects.
Additional Updates
Collapsible panels and headers are now possible on all details pages now using the arrow button icons under the top-right edit button.
The open tasks dashboard filters can now be toggled using the "f" keyboard shortcut, similar to how the grid filter row can be quickly toggled.
An "Is Late?" filter was added to the list of available options on the open tasks dashboard.
A project setting was added to have due dates default to ongoing while creating new projects.
For Enterprise organizations that use the SFTP file import service, billing entries can now be bulk-imported at the workspace, client, or matter levels as desired. See the help documenation for more information.
Bug Fixes
Fixed an intermittent rendering issue where the action links panel on details pages would sometimes not appear.
Fixed an intermittent rendering issue where single choice fields in modal windows would not show the selected value in edit mode.
Fixed an issue where the filter notification for the "My Open Projects" dashboard failed to appear when a filter was applied.
Referencing Custom Objects
What’s New?
In our latest update, we introduced the ability to reference objects from within other objects. While object referencing was previously available in task forms, users can now reference information stored within system objects as well as custom objects created by the user. This ability adds functionality, flexibility and consistency to objects allowing for additional fields that no longer require free hand inputs. There are unlimited ways to use object referencing, here are just a few examples.
Referencing system objects: Matter example
Adding the name of a billing attorney to a particular matter can help clearly define which attorney is responsible for the matter and the associated billing. By referencing the contact list in Agility Blue, details in addition to the name of the attorney will be available directly from within the matter details page. To reference the contacts object from within the matter object, use the following steps:
Navigate to the settings gear icon and select objects. From within the objects page select Matter. This will open the edit object window for Matter. Add a new field to the object and select reference as the field type. Name the field “Billing Attorney” and select Contacts from the object picker. Once saved you can now select from the contacts list within the object to assign a billing attorney or attorneys to the Matter!
Navigate to the settings gear icon and select objects:

From within the objects page select Matter:

This will open the edit object window for Matter. Add a new field to the object and select reference as the field type. Name the field “Billing Attorney” and select Contact from the object picker.


Once saved you can now select from the Contacts list within the object to assign a billing attorney or attorneys to the Matter!


Referencing custom objects
Adding a custodian field to media log entries allows users to track the custodians of a particular media log directly from within the media log object. Details about the associated custodian will be pulled from a custom object setup with a list of all custodians and will provide the details from within a media log entry. To reference the Custodians object from within the media log object, use the following steps:
Create a new Custom object called Custodian, for details on setting up custom objects follow the link Agility Blue Custom Objects. Navigate to the settings gear icon and select objects. From within the objects page select Media Log Entry. This will open the edit object window for Media Loge Entries. Add a new field to the object and select reference as the field type. Name the field “Custodian” and select Custodian from the object picker. Once saved you can now select from the Custodian list within the object to assign a custodian or custodians to the media log entry!


Referencing Custom Objects: Media Tracking Example
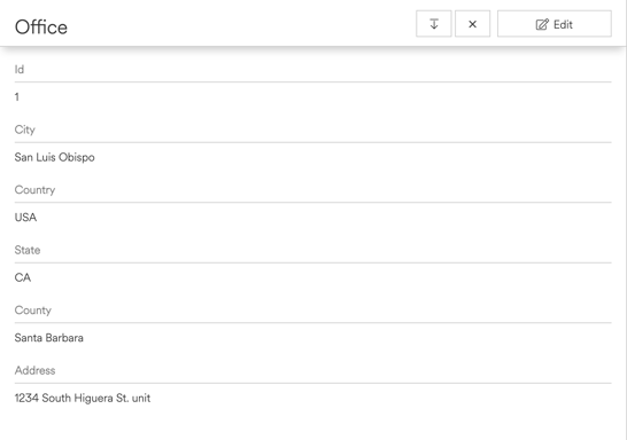
Custom objects can now reference one another and be used for reporting as well as the quick location of detailed entries. Adding a Hard Drive Inventory object to Media Log Entries with a referenced Office storage location imbedded within the entry is an intricate example. To reference an office location from within a Hard Drive Inventory object, use the following steps:
First, create a new custom object called Office. (To learn how to create custom objects, check on the article Agility Blue Custom Objects. While creating the object include any pertinent address fields and select the city as the reference field. The filed marked refrence will be the piece of information displayed as the refrence link.

Create a second object called Hard Drive List. Follow the same above steps and add fields for details about the hard drives, making sure to select the device serial number as the reference field. Add one additional reference field called Location and reference the Office object you just created. Navigate to the File Cabinet icon in the top blue-ribbon bar, this menu contains all custom objects for the workspace and appears after the first object is created. Select the Office list and create new entries with the appropriate details.

Follow the same steps for Hard Drive Inventory and use the referenced Office field to pick from the different Offices in the newly created list.


Edit the Media Log System object and add a field called Hard Drive and reference the newly created Hard Drive List object.

You can now select a hard drive from the list when creating Media Log entries and the location of the hard drive will be available and pulled directly from the office list!


Agility Blue Update (November 2022)
What's New?
The November 2022 update is packed with exciting new features. Stay tuned for more details about how to get the most out of the latest update.
Object Reference Fields

A new "Reference" field type has been added to the Objects Form Editor that gives users the ability to reference other objects. The following objects are available for reference:
Clients
Matters
Projects
Tasks
Media Log Entries
Volumes
Contacts
Users
Billing Entries
Custom Objects
Enhanced Viewing and Organization Options
The order of custom object lists can now be defined using a sort order value while editing custom objects. Additionally, custom objects can now be delisted from the menu, if desired. If an object is delisted from the dropdown menu, the object's records can still be viewed by selecting the "View Records" grid row context menu item on the objects page.
Added a text filter to the form builder modal window to help locate fields of interest quickly.
Added a button to remove all fields at once from the form builder.
A view mode has been introduced to objects that allows viewing an object's fields in a form-style layout in a modal window as read-only. Supported reference objects will now open the view window where there was no link before, or instead of navigating away from the page where there was a link. View modes can also be found within the various grid context menus as the first listed option.
A view button (eye icon) has been added to the client and matter breadcrumb links to allow viewing client or matter fields without having to navigate away from the current page.
Extended Search and Filtering Capabilities
Comments for clients, matters, and tasks can now be searched for on the search page.
Task email messages can now be searched for on the search page.
Search results are no longer cleared when navigating away from the search page. This allows users to use the back browser button after clicking on a search result to return to the existing search results without having to perform the same search again.
The search page now also remembers the last tab used within the user's current session. Previous behavior was that searches always defaulted to the "Projects" search tab after a user navigated away from the search page.
The task search results pages now render project tags and custom object references.
The Narrative and Notes fields are now filterable on all billing entry grids.
Additional Updates
The Billing Code field was added to the billing entry modal window. This information is pulled from the selected billing type, and is read-only.
Grid export filenames now reflect the grid name and date/time of export. Additionally, the Excel workbooks now enable filters by default and adopt the Agility Blue color schemes.
The maximum file name size of an attachment has been increased from 128 to 255 characters.
It is now possible to make the "From" and "To" fields on the media log entry form no longer required and hidden. This can be controlled on the media logs tab on the general workspace settings page.
Email replies to the "New Task Email Message" and "Update Task Email Message" notification types are now created as comments within the task.
The "General instructions" form will no longer be required or used for creating inbound emails. When an email comes in, the notification service will first look for a form called "Inbound Email". If the form doesn't exist, it will be automatically created. This enables users to freely delete or modify their general instructions form now without having to worry about emails not showing up.
Bug Fixes
Fixed an issue where certain special characters would throw an api error when using the global search function.
Fixed an issue where the contacts grid treated all system fields as text values when filtering.
Fixed an issue where moving a task would not update associated billing entries and volumes with the new project id.
Agility Blue Update (August 2022)
What's New?
The August 2022 update is packed with new enhancements and features. Stay tuned for more details about how to get the most out of the latest update.
Improved User Management for Admins
Workspace Management
Organization admins can now enable/disable workspaces, and edit workspace names and descriptions.
Added a new workspace access tab page and grid to the user account details page.
API Management
Added a "Total API Keys" column to the user accounts grid details page.
The user account developer page now masks API keys by default. Click the mask link to reveal the API key.
Object Management
Object IDs have been moved into the breadcrumb navigation component, and a button to copy the object id is now available next to the "Copy the url link to this page" button. Object IDs in the breadcrumb are hidden by default, and the hash icon ("#") can be clicked on to reveal the ID. Object IDs can be shown at all times by switching the "Always Display Object IDs" setting on under workspace settings.
Enhanced Experience for Power Users
Project Details
The project details action panel has a new "Action Links" tile at the bottom that allows project-specific reports to be linked directly from the project.
A new report was added titled "Project Details" that generates a project and task details report for a single project in a print-friendly format. Useful for situations where project information may need to be saved offline in a file repository or document management system. The report includes the project details, tasks, and each task's comments. Task comments can be toggled on or off in the report. This report is also linked to the project object and showcases the ability to initiate it directly from the new action links tile at the bottom of the project details panel.
Workspace Permissions
Added a permissions setting for allowing users to view action links under the Misc category. The workspace administrators permissions group has view permissions by default, but other permissions groups need to be set for their users to see the links if desired.
The following settings were added under the "Projects" permissions tab:
Hide Invoiced Field: Hides the invoiced field on the project details action panel.
Hide Pricing Field: Hides the pricing field on the project details action panel.
Hide Approved Field: Hides the approved field on the project details action panel.
Forms Editor
Form Preview: Forms can now be previewed for design and functionality while editing a form or directly from the forms grid. This speeds up the development of forms and helps to eliminate the need to go through the process of creating a task just to test forms.
Faster Task Management for All Users
Task toolbar updates:
Removed the restriction where a task comment could not be replied to, edited, or deleted if the task was closed.
Added a button that allows a user to assign the task to themself and mark it complete in one click.
Added an "Assign this task to me" button that was previously only available via the task context menu.
Buttons that allow adding logs or object associations that became hidden when a task was completed are no longer hidden, keeping consistent with the fact that these items could still be added through their respective task tabs regardless of task status.
A "Save & Complete Task" button has been added to the task comment modal window that allows saving a task comment and marking the task done at the same time. Depending on the state of the task, the following happens:
If the task is unassigned, the task will become assigned to the user creating the comment prior to marking the task as completed.
If the task is in quality control, the quality control decision will become "Passed" prior to marking the task as completed.
The "Save & Complete Task" button will not be available if the task is in the process of being placed on hold, in a canceled state, or is already completed.
Task form fields will now display a scroll bar if the contents of a single line are too long to fit within the bounds of the task.
An "Unassign" button has been added to the assign task user modal window next to the "Assign to me" button.
Bug Fixes
Fixed an issue where notes for an attachment would not display in object detail page grids.
Fixed a rendering issue with the select priority and select email message status pickers when initiated from the notification rule conditions editor.
Agility Blue Update (June 2022)
Communications Suite Updates
Added the ability to download inbound email messages as .EML files.
The context menu item "Reply All" text was changed to "New Email with Contacts" for all emails before the last email message to make it clearer what the functionality is intended to do.
The inbound notification service was updated to convert html-only emails to plain text that do not arrive with a plain text counterpart. Previously, the service would render the html-encoded version of these emails as plain text that displayed html tags making the content difficult to read.
Grid Page Updates
Added a new grid page titled "Task Form Fields" to the additional items (hamburger) menu. The grid on this page represents every field within each task as individual records. This provides the ability to filter and sort through task forms, section headings, fields, field values, and more. Most of the fields found on the tasks grid are available in the task form fields grid to help provide context, navigation, and additional sorting/filtering capabilities for each field. Please note that reference field values are not supported within this grid at this time.
Added a "Clear Sorting" button to all grids directly to the left of the "Clear Filters" button.
Rich text rendered grid items now cap their row heights to 200px and automatically add scroll bars within the cell as needed.
Added a permissions setting for allowing users to view the task form fields list page. The workspace administrators permissions group has view permissions by default, but other permissions groups need to be set for their users to view task form fields.
Enterprise Updates
The SFTP import service was updated with the ability to import media log entries.
Bug Fixes
Fixed an issue where creating new forms that were copied from existing forms would also copy the section id of the existing form instead of generating a new one. This prevented conditions on the new form fields from working as intended when editing a task.
Fixed the following grid value rendering issues:
Project tags and form name fields on the projects and tasks grids that contain the following symbols now display correctly: &, <, >, ', and ".
Multiple choice values now properly display semicolons after the second choice.
Agility Blue Update (April 2022)
What's New?
Media Log Entry Association
Media log entries no longer require a project or task just to be associated with a client or matter.
The project and task selection controls on the media log entry form have been replaced with an association dropdown list that allows users to select which level of the hierarchy the media log entry should belong to.
Additionally, controls have been added to allow media log entries to be created directly at the client and matter levels.
Ignored Files Registry
An option to add files to an ignored files registry is now available for attachments. Doing so will direct the inbound email service to ignore attached files and inline images that match the registered SHA256 hash values for emails sent into Agility Blue. This is particularly useful for instructing the inbound email service to not create and upload attachments from images that are part of signature lines.
Entries may be added directly from an attachment and the registry can be managed from a new tab on the workspace settings page. Notes may also be added to each entry so a reason for ignoring the file can be captured.
Permissions Additions
13 new permissions have been added. The workspace administrators permissions group will already have full rights for the following permissions, but other permissions groups may need to be set by a workspace administrator for their users to have visibility as desired:
Allowing users to view the projects tab on the client details page.
Allowing users to view the tasks tab on the client details page.
Allowing users to view the media log entries tab on the client details page.
Allowing users to view the volumes tab on the client details page.
Allowing users to view the billing entries tab on the client details page.
Allowing users to view the tasks tab on the matter details page.
Allowing users to view the billing entries tab on the matter details page.
Allowing users to view the Relativity tab on the matter details page.
Managing the permissions for the ignored files registry settings page.
Managing the permissions for the integrations settings page.
Viewing the history and notification logs pages.
New permissions setting for task subscribers.
New permissions setting for email templates.
Other Enhancements
Tasks can now be assigned while creating a project from a copied project or a project template.
The list of subscribers can now be added/removed from tasks while creating a project from a copied project or a project template.
Billing type properties can now be saved with the same price as the inherited price so the price can be "locked in" and avoid being changed when parent pricing information changes.
Total Client Comments field added to the clients grid.
Total Matter Comments field added to the matters grid.
Bug Fixes
Fixed an issue where the "Require Project Due Date" setting was being ignored when converting from a draft project to a normal project.
Fixed a permissions issue where creators of some objects could not delete those objects after their delete permissions were subsequently revoked.
Fixed an issue where project templates could not be saved when the "Require Requester" project setting was turned on and the "Auto-Populate Requester" project setting was turned off.
Agility Blue Featured At The Master's Conference
Agility Blue was featured in the latest insightful and entertaining Master’s Conference session, held online in December. Melissa Weberman and Greg Jordan from Arnold & Porter’s eData Group gave a presentation titled “Don’t Mind the Gap – Reducing the Communication Gap and Other Legal Operations Obstacles.” In this talk, Melissa and Greg highlighted the challenges litigation support teams face in communicating with case teams on eDiscovery projects, and how they integrate the Agility Blue Request Portal into their workflow to help them streamline communications and project instructions.
If you missed the session, you can still check it out below:
New Feature: Agility Blue Teams
What’s New?
In our latest update, we added an exciting new feature called Agility Blue Teams. With teams, you can easily manage groups of users that share the same set of permissions and notification rules. Applying these settings at a team level helps to cut down on administrative time and lets you apply changes in one centralized location.
For instance, you may have a group of users who want receive notifications when new unassigned tasks are created. By adding the users to a team that has notification rules set up for this event, you no longer need to manage the individual users' notifications.
Teams can also be used in place of individual users in designating project owners and assigning tasks. When a team is assigned instead of an individual user, all members of that team become eligible to receive notifications and can work on the task. Teams can also be used in task comment mentions or as task subscribers on individual tasks.
Create Teams
To start adding teams, first navigate to the workspace settings page by clicking on the gear icon at the top right and selecting the Settings item. Once on the workspace settings page, click on the Teams tab on the left.
To create a new team, click on the New Team button. Fill out the required Name field and an optional description. Click on the Save button. Your new team will be listed on the workspace settings teams page.
The Teams page will display a card for each team, where several team management functions are available:
1. Clicking on the team name will bring you to its details page. This page has tabs for insights, users, notification rules, projects the team is associated with, and tasks the team is associated with.
2. The user count badge and the users icon button will both open up a window that allows you to add or remove users.
3. The edit icon button will allow you to update the team name and description.
4. The trash icon button will allow you to delete the team.
Team Notification Rules
Users that belong to teams will inherit the notification rules configured for it. To manage team notification rules, navigate to the details page by clicking on the team name in the settings page or on the workspace users list. Once on the team details page, click the Notification Rules tab on the left.
From this screen, you can:
1. Enable/Disable all of the individual notification rules.
2. Delete all of the individual rules.
3. Filter the rules using a keyword search.
4. Apply the team-based default notification rules.
5. Copy rules from other users or teams.
6. Create a new notification rule.
7. Disable all notifications for the team.
Team Permissions
Teams can also be added to permission groups in the same way as single users. Navigate to the settings permissions tab, click on the user management icon button for the permission group you would like to add the team to and select the team under the add user or team section. All users within a team will inherit the permissions for that team.
For more information, please check out our video:
Agility Blue Custom Objects
In Agility blue, you can now create custom objects that can be kept as stand-alone information records, or used as a reference in task forms. There are unlimited ways to use custom objects; for example, you can track collections with Custodian object, or reference all required metadata in ESI protocols. Here is how to get started with custom objects.
Managing Custom Objects
To create a custom object, navigate to the objects list page by clicking on the gear icon at the top right and selecting the Objects item. In this example, let's add a Custodian object. Click on the New Object button to begin.
One field must be marked as the Reference Link field using the checkbox input below the field name. The information entered into this field will be what's displayed when the object is referenced. It will also be the field that is clickable in order to view the object.
Once the object is saved, it will appear in the objects list. The object can be edited or deleted by clicking on the record's context menu.
If this is the first custom object created in your workspace, a new menu icon will show up on the navigation bar right after the Tasks tab. Click on this icon, and you will see your custom object. This is where all of the custom objects in your workspace will appear.
Clicking on the list item will bring you to that custom object's list page where you can view and manage instances of the object.
Creating Instances of a Custom Object
After custom objects have been created, instances of the objects can be managed through the custom objects tab on the navigation bar located right after the Tasks tab.
Click on the custom object list item to go to that object's list page.
The grid view lists out each instance of the object and will allow you to sort, filter, manage column visibility, re-order columns, and export visible data to an Excel spreadsheet.
To create a new instance of your custom object, click on the New Entry button.
Referencing Custom Objects
Custom objects can be referenced in task forms just like system objects. While creating or editing a form, use the Reference field type and select your custom object.
For example, let's say that we wanted to use the custodian object we created as a reference field in a "Forensics Collection" task form we're making. We would create a new field that uses the Reference field type and select our Custodian object as the object type to reference.
Selecting Custom Objects in a Task
When the creating a new task with this form, the Custodians field will show a hyperlink titled "Select Values...". Click on this link to be presented with a grid view selection list of existing custodian records. We can choose to select one or more existing custodians from the list, or we could create a new custodian "on the fly" from this window by clicking on the + button next to the Select button on the window title bar and creating a new custodian.
Each custom object instance will have a link icon next to it. When clicked, it will open a window that shows all of the information for that instance of the object. The object entry can be edited from here, but keep in mind that any edits to a referenced object will directly edit that entry.
For more information, check out our video on custom objects: